
A model can look excellent in a portfolio render yet fail inside a game. The textures may load correctly and the silhouette may still look convincing, even when the initial import reveals no obvious errors. Some problems become visible only after the asset starts moving, is placed repeatedly throughout a level, or is tested on the project’s target hardware.
This is where a visually finished model either proves it is ready for production or reveals the technical work that still needs to be done. It must be built for a specific role and delivered in a condition that allows the next artist, animator, or developer to use it without rebuilding it.
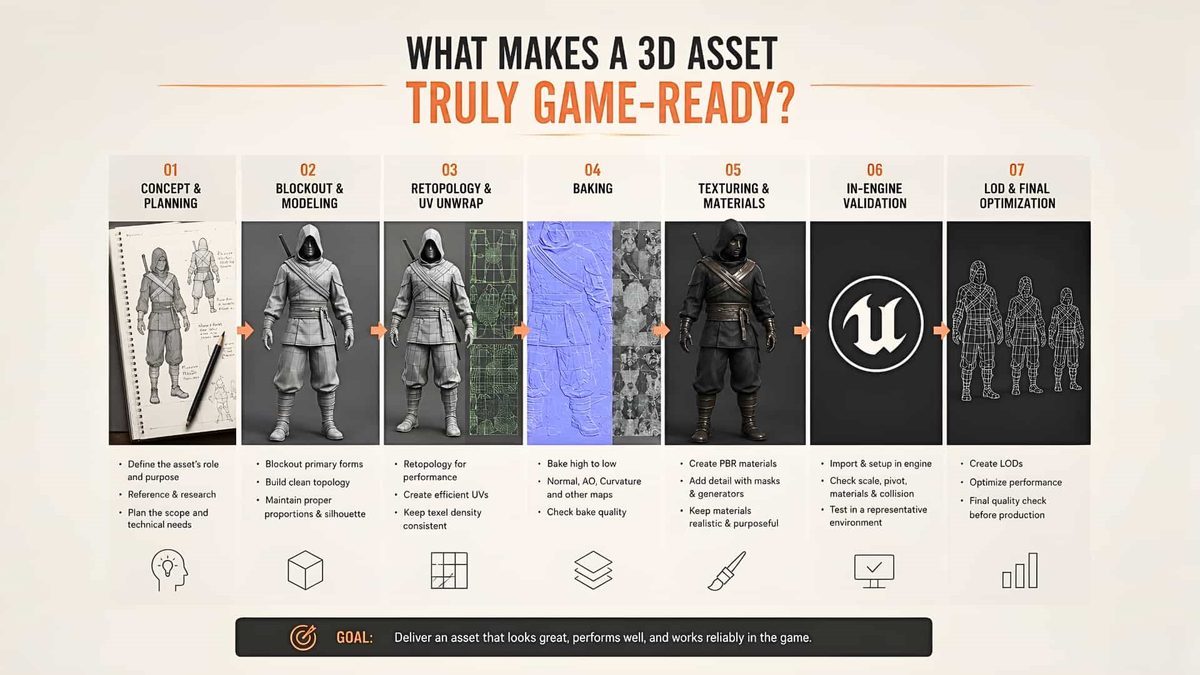
A Good Render Does Not Prove an Asset Is Game-Ready
A controlled render lets the artist choose the camera, pose, and lighting. Once the asset enters gameplay, those conditions are no longer fully controlled. Players may inspect the model from an unfamiliar angle or trigger an animation that exposes weak topology and uneven skin weights.
A beauty shot can prove that the model looks good, but it cannot confirm that game-ready 3D assets will remain reliable under actual gameplay conditions.
3D Asset Optimization Starts With the Asset’s Role
Before placing the first edge, the artist needs to know where the model will appear, how close the camera can get, and whether it will move. In professional game art production, a hero prop seen at close range has different needs from a background object scattered across a large environment.
Strong 3D asset optimization begins with context. A chair used once in a cinematic room can justify detail that would be wasteful on a prop repeated throughout a mobile level.
Production also demands prioritization. Spending more time does not automatically create a better asset. If an accessory is usually viewed from behind, its exposed side deserves more attention than an area that remains hidden beneath another garment.
Clean Topology Is About Function
The term clean topology is often treated as a visual standard. Some artists assume every surface should use quads and look perfectly organized. That may help while learning, but production topology has a different job.
For a static prop, the mesh should preserve the silhouette and shade predictably. For clothing, edge flow must also support compression, twisting, and volume retention.
In practice, clean topology preserves the silhouette, produces stable shading, and places enough geometry around areas that need to bend. A less uniform wireframe may perform better than a perfectly ordered one when its edge flow follows joint movement and visible changes in form.
Retopology Is a Design Decision
The difficult part of retopology is deciding which forms must remain in the mesh and which details can be transferred to a normal map. Large folds that change a garment’s outline may require supporting edges. Fine scratches, shallow engravings, pores, and minor fabric wrinkles can usually be represented through normal or detail maps instead.
Effective 3D asset optimization does not require reducing the polygon count at every opportunity. The artist should keep polygons that alter the silhouette, stabilize shading, or help the mesh bend. Geometry the player will never notice can be simplified.
The right result depends on what the asset must do, not on how impressive its wireframe looks in a screenshot.
Polycount and LOD Depend on the Project
No single triangle count works for every chair, weapon, building, or character. A sensible budget depends on target hardware, viewing distance, instance count, animation needs, material cost, and the load created by the rest of the scene.
Polycount and LOD targets should be based on the project’s camera, platform, and performance budget rather than borrowed from an unrelated asset breakdown. A close-up object may justify dense geometry. A repeated background prop may need aggressive simplification.
LOD models should preserve the features that remain visible as the object becomes smaller on screen. Removing triangles without protecting the silhouette can create distracting shape changes. A lower triangle count offers little benefit if the LOD transition becomes distracting during gameplay.
Systems such as Nanite have changed the geometry limits for some static assets, but they have not removed the need for testing. Animated meshes, fallback geometry, collision, and material complexity still affect performance. Polycount and LOD remain part of the production budget.
Surface Detail Should Reflect Use
A technically correct mesh can still look artificial when its surface wear does not match how the object would actually be handled.
Scratches belong where contact occurs. Dust gathers naturally in recesses and low-contact areas. Applying the same wear generator to every edge creates a uniform pattern that rarely matches real use.
Materials for game-ready 3D assets should also be checked outside the beauty render. Dramatic lighting can hide roughness problems, weak normal information, and shading errors. A neutral lighting pass often reveals whether the material holds up on its own.
The goal is to make detail believable at the distance where the player will see it.
Real-Time Rendering Is Part of Development
Real-time rendering allows the artist to evaluate the asset under the same visual conditions used by the game. This is where material response, normal information, roughness values, and lighting behavior can be judged more accurately than in a controlled beauty render.
A material may look convincing under one HDRI and appear flat, noisy, or overly reflective in another environment. Shading errors can also become more visible when the light direction changes or the camera moves closer to the surface.
Before approval, the artist should check three things:
- whether the silhouette, shading, and material response remain convincing across practical camera distances and lighting conditions;
- whether texture resolution, material complexity, and normal-map detail are appropriate for the asset’s role;
- whether performance remains acceptable when the model is animated or placed as many times as the final game requires.
Real-time rendering should influence material, lighting, and performance decisions throughout development rather than being reserved for the final presentation.
Animated Assets Must Survive Demanding Poses
Clothing exposes problems that may never appear on a static prop. A sleeve can look finished in a T-pose and collapse as soon as the elbow bends.
A raised arm may pull the garment into the torso, while uneven shoulder weights can stretch the surface. On one clothing asset, a sleeve that looked correct in the viewport collapsed around the elbow after skinning. The problem was not polygon density but the edge flow and skin-weight distribution.
The artist should test the poses that place the greatest pressure on the rig, including deep joint bends, raised arms, seated positions, and rapid movement. These tests reveal whether the topology and skin weights can support the intended animation.
For animated game-ready 3D assets, stable deformation is part of the visible quality of the artwork.
Engine Validation Should Happen Early
Engine validation should begin before the artist considers the asset final. Importing the model early can expose incorrect scale, an impractical pivot, skeleton mismatches, unsuitable collision, broken material assignments, or errors in the export settings.

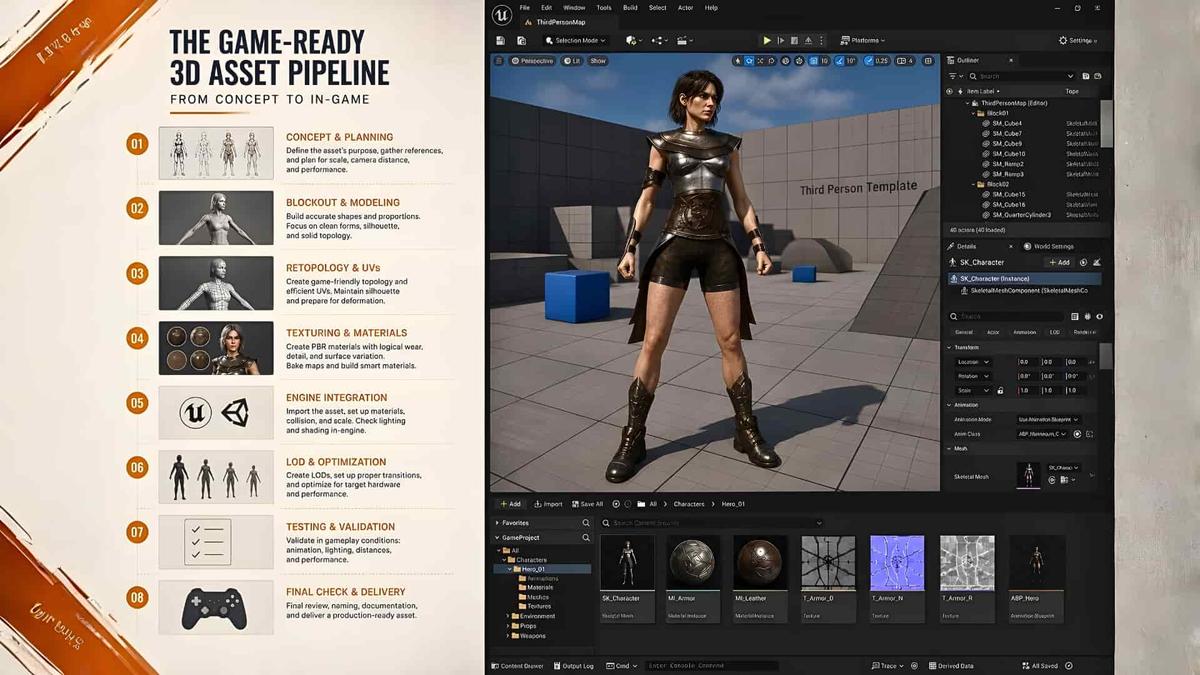
The asset should be exported, imported into the target engine, and placed in a representative test scene. When a problem appears, the artist must determine whether it comes from the source mesh, rig, export settings, or engine configuration.
This technical validation is essential for catching pipeline issues before they affect animation, level design, or final implementation.
Engine validation also affects polycount and LOD planning. A mesh that performs well in an empty level may become expensive once the final scene includes characters, lighting, effects, and repeated assets.
In practice, most game-ready 3D assets go through several export, import, testing, and revision cycles before they are dependable enough for production.
Decision-Making Is the Skill That Lasts
Working first on simple objects such as a chair or bed makes it easier to identify whether the problem is proportion, topology, UV layout, or material response. Later projects can introduce clothing, rigging, and engine interaction.
A useful learning project should be slightly harder than the previous one without introducing so many new variables that the source of a problem becomes unclear.
Optimization always involves compromise. Preserving more detail may increase rendering cost, while simplifying the asset can reduce visual quality or flexibility. Good 3D asset optimization depends on knowing which compromise makes sense for the project.
What Truly Makes an Asset Game-Ready?
Game-ready 3D assets must meet the project’s visual standard while remaining dependable under gameplay conditions and within the agreed technical budget.
A stronger asset is not necessarily the one with the fewest polygons or the largest textures. Its cost should match its contribution. A hero object may justify a higher geometry budget because it appears close to the camera. An animated garment has a different priority: its topology and skin weights must remain stable in motion.
At Aalix Studio, we develop and test game art in the environment where it will actually be used not only in isolated beauty renders. Our process considers topology, deformation, material response, optimization, and engine performance from the beginning of production.
Explore our game art and asset production services, or contact us to discuss a new game-ready 3D asset project.